Replacing control arms
Car using alot of had and loss
of power
Are you needing to replace the front, or rear? I'm assuming the front (upper and lower), so I've included the step-by-step instructions for the job. ------------------------ REMOVAL AND INSTALLATION Arm, Upper Removal Raise the front of the vehicle and position safety stands under both sides of the frame just behind front suspension lower arm (3078). Refer to Lifting, Jacking, and Spare Tire Stowage. Remove the wheel and tire. CAUTION CAUTION: The floor jack will support the spring load on the front suspension lower arm. Position floor jack under the front suspension lower arm and raise jack to support front suspension lower arm. Remove retaining nut from upper ball joint stud to front wheel spindle pinch bolt. Tap pinch bolt to remove from front wheel spindle (3105). With a suitable pry bar, spread slot to allow ball joint stud to release out of front wheel spindle. Remove the front suspension upper arm retaining bolts and remove front suspension upper arm (3083) assembly. ------------------------------- Installation Use reference marks from camber and caster cams as initial settings. Item Part Number Description 1 3079 Front Suspension Lower Arm 2 — Camber Adjust 3 — Reference Mark 4 — Caster Adjust 5 3049 Front Suspension Upper Ball Joint 6 — RH Identification on Forging 7 — Reference Mark A — Turn adjusting cams clockwise to increase and counterclockwise to decrease Position the front suspension upper arm to the frame bracket and install the two retaining bolts and nuts. Tighten to 148-201 Nm (109-148 lb-ft). Connect the upper ball joint stud to the front wheel spindle and install the retaining pinch bolt and nut. Tighten the nut to 76-104 Nm (56-77 lb-ft). Install the wheel and tire. Remove safety stands and lower front of vehicle. Check caster, camber and toe. Adjust as required. Refer to Suspension — Service.

REMOVAL AND INSTALLATION Arm, Upper Removal Raise the front of the vehicle and position safety stands under both sides of the frame just behind front suspension lower arm (3078). Refer to Lifting, Jacking, and Spare Tire Stowage. Remove the wheel and tire. CAUTION CAUTION: The floor jack will support the spring load on the front suspension lower arm. Position floor jack under the front suspension lower arm and raise jack to support front suspension lower arm. Remove retaining nut from upper ball joint stud to front wheel spindle pinch bolt. Tap pinch bolt to remove from front wheel spindle (3105). With a suitable pry bar, spread slot to allow ball joint stud to release out of front wheel spindle. Remove the front suspension upper arm retaining bolts and remove front suspension upper arm (3083) assembly. ------------------------------- Installation Use reference marks from camber and caster cams as initial settings. Item Part Number Description 1 3079 Front Suspension Lower Arm 2 — Camber Adjust 3 — Reference Mark 4 — Caster Adjust 5 3049 Front Suspension Upper Ball Joint 6 — RH Identification on Forging 7 — Reference Mark A — Turn adjusting cams clockwise to increase and counterclockwise to decrease Position the front suspension upper arm to the frame bracket and install the two retaining bolts and nuts. Tighten to 148-201 Nm (109-148 lb-ft). Connect the upper ball joint stud to the front wheel spindle and install the retaining pinch bolt and nut. Tighten the nut to 76-104 Nm (56-77 lb-ft). Install the wheel and tire. Remove safety stands and lower front of vehicle. Check caster, camber and toe. Adjust as required. Refer to Suspension — Service.

REMOVAL AND INSTALLATION Arm, Upper Removal Raise the front of the vehicle and position safety stands under both sides of the frame just behind front suspension lower arm (3078). Refer to Lifting, Jacking, and Spare Tire Stowage. Remove the wheel and tire. CAUTION CAUTION: The floor jack will support the spring load on the front suspension lower arm. Position floor jack under the front suspension lower arm and raise jack to support front suspension lower arm. Remove retaining nut from upper ball joint stud to front wheel spindle pinch bolt. Tap pinch bolt to remove from front wheel spindle (3105). With a suitable pry bar, spread slot to allow ball joint stud to release out of front wheel spindle. Remove the front suspension upper arm retaining bolts and remove front suspension upper arm (3083) assembly. ------------------------------- Installation Use reference marks from camber and caster cams as initial settings. Item Part Number Description 1 3079 Front Suspension Lower Arm 2 — Camber Adjust 3 — Reference Mark 4 — Caster Adjust 5 3049 Front Suspension Upper Ball Joint 6 — RH Identification on Forging 7 — Reference Mark A — Turn adjusting cams clockwise to increase and counterclockwise to decrease Position the front suspension upper arm to the frame bracket and install the two retaining bolts and nuts. Tighten to 148-201 Nm (109-148 lb-ft). Connect the upper ball joint stud to the front wheel spindle and install the retaining pinch bolt and nut. Tighten the nut to 76-104 Nm (56-77 lb-ft). Install the wheel and tire. Remove safety stands and lower front of vehicle. Check caster, camber and toe. Adjust as required. Refer to Suspension — Service.
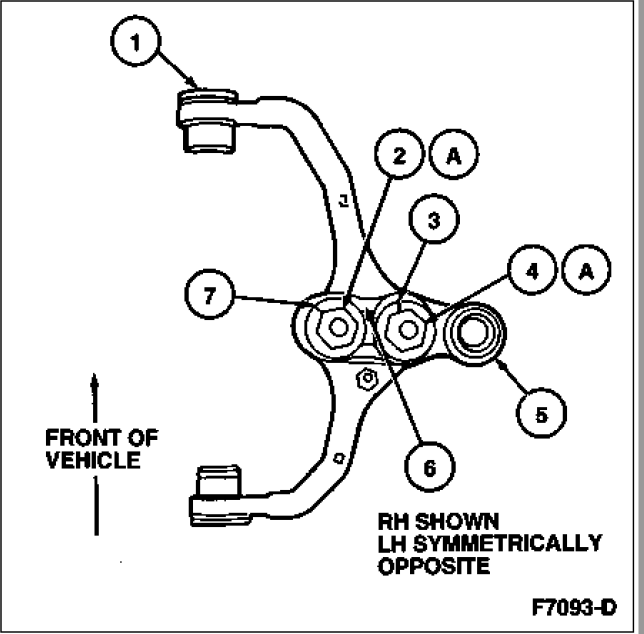
Front or rear, or both? I'm assuming front (upper and lower), so hopefully this helps... REMOVAL AND INSTALLATION Arm, Upper Removal Raise the front of the vehicle and position safety stands under both sides of the frame just behind front suspension lower arm (3078). Refer to Lifting, Jacking, and Spare Tire Stowage. Remove the wheel and tire. CAUTION CAUTION: The floor jack will support the spring load on the front suspension lower arm. Position floor jack under the front suspension lower arm and raise jack to support front suspension lower arm. Remove retaining nut from upper ball joint stud to front wheel spindle pinch bolt. Tap pinch bolt to remove from front wheel spindle (3105). With a suitable pry bar, spread slot to allow ball joint stud to release out of front wheel spindle. Remove the front suspension upper arm retaining bolts and remove front suspension upper arm (3083) assembly. ------------------------------- Installation Use reference marks from camber and caster cams as initial settings. Item Part Number Description 1 3079 Front Suspension Lower Arm 2 — Camber Adjust 3 — Reference Mark 4 — Caster Adjust 5 3049 Front Suspension Upper Ball Joint 6 — RH Identification on Forging 7 — Reference Mark A — Turn adjusting cams clockwise to increase and counterclockwise to decrease Position the front suspension upper arm to the frame bracket and install the two retaining bolts and nuts. Tighten to 148-201 Nm (109-148 lb-ft). Connect the upper ball joint stud to the front wheel spindle and install the retaining pinch bolt and nut. Tighten the nut to 76-104 Nm (56-77 lb-ft). Install the wheel and tire. Remove safety stands and lower front of vehicle. Check caster, camber and toe. Adjust as required. Refer to Suspension — Service.
Thank you. You guys are awesome.
